
Lighting Set Up, Tips & Optimisations for Screen-Space and Lumen
- Abby Karnstein
- Jan 16
- 7 min read

Updated: Jan 18
The first step should be setting up your ambient lighting, whatever scene you're working from, remove all lighting and fog until your screen is completely black. From here we can set up the ambient lighting, which basically means making your scene legible even without the addition of the directional light. For a lot of things I'm going to go through there's a tonne of great resources, but the most useful one I've come across is this Miro board by Elliott McSherry.
If you aren't using World Partition its a good idea to use a dedicated sub level for your global lighting, so everyone working in the level can see what's going on without you needing to keep the main level checked out, make sure the lighting sub level is set to always be loaded and is added to the persistent level list.
The first step is to enable this plugin, not 100% necessary, but it allows your HDRI, sky sphere and skylight to remain coupled.

Your skylight will almost always want to be left at an intensity of 1.0, rather, we want to use the intensity of the HDRI to boost our values into the type of outdoor lighting/ToD we want to achieve. It's helpful to set up your exposure values inside your Post Process Volume alongside the HDRI to better balance your results. For my scene I want a bit of a lower, early morning vibe, so I'm setting my exposure about where you would expect for PBL.

Most likely you also have some interiors along with your exterior, and for that it can be good to have +1 stop on your max EV, so the scene brightens ever so slightly when you're out of direct sunlight- a bit more on that later.

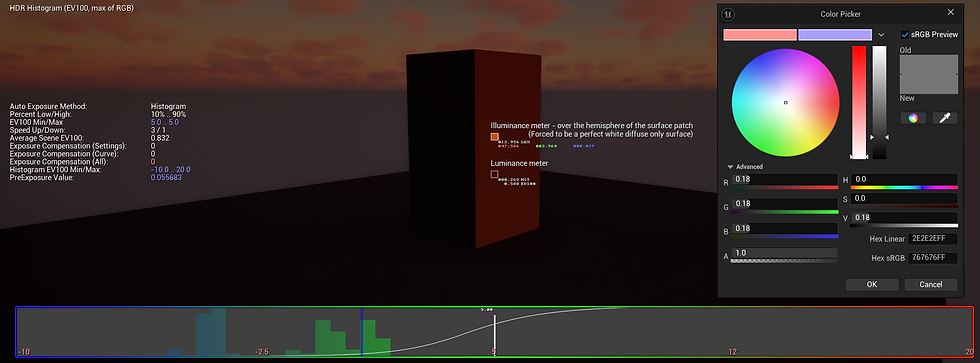
Now for the worst UI you've ever laid eyes on: the Light Meter. You can set a key bind to bring this up in your editor preferences under Visualise HDR (Eye Adaption). The font is almost impossibly small to read, especially on a 4k monitor, but I find right clicking in the viewport will temporarily increase the size, albeit not much. Pointing your meter skyward will give you a nit value, which is directly convertible to candelas (1 nt = 1 candela/square meter) that can be checked against real-world values.


Adjustments to the Toe and Slope will adjust the exposure curve, helping to bring more visibility into dark shadowed areas an interiors. Skylight Leaking is another way to increase ambient light, but all of these should not dramatically impact the exterior lighting negatively.


Now with your ambient values balanced you can finally add in your directional. Mine is set to 5,000 lux. Using Ctrl + L will bring up a gizmo that controls the 'sun' rotation, allowing you to pick a direction and height. Continue holding Control and move your mouse to get the angle you want.
Lighting conditions also have real world values in relation to sun position on the horizon, dusk can range from 0 to 18 degrees below the horizon, and has three stages.


The last thing to do is add in your height fog, which should be ticked to use volumetric. The density and the start offset are free for you to art direct, but be aware the latter value will also affect the built in Local Fog Volumes, and may cut them off earlier that you want.
With the directional light in, you can also check your shadow contrast against PBL to see if you're in the right ballpark. Clear, sunny days will have several stops of contrast between light and shadow, while overcast, sunset and dusk won't show much shadow detail at all.

Contrast is best tested with a couple of meshes with a mid grey (0.18 in linear colour space) material added onto them. A lot of people also use an array of spheres, which are useful for checking reflections. Here I can take readings from both sides of my cube on the lit and unlit side to see how much contrast difference there is between them.
Local Lights
It can be helpful to lay out your lights and pick colours before starting on local lighting. Any colours you decide on that fit your chosen colour scheme can be dragged to the top of the colour picker and saved for easy use on all other lights. Ctrl + Shift + L + LMB will add a point light with whatever colour is currently under your cursor.

Lighting Channels are incredibly useful for dictating what local lights can effect in the world, allowing you full control of your lighting without having any strange errors like the light source clearly being affected when it doesn't make sense.

I use them here for my cultist to light the character without having additional, random lights on the floor

Any light fixtures like candles or streetlights are probably worth making blueprints for, so as not to have to manually add the same light to each actor in the level. Lights can then be tweaked per instance of the blueprint later if necessary.
Lumen Overview & Optimisations
LGI (Lumen Global Illumination) is a direct replacement for SSGI and DFAO, using infinite bounces, distance fields (mesh, signed and global) and a per-object surface cache to deliver high quality, physically accurate lighting results.
Lumen can be used on a wide range of hardware and doesn't necessarily require a high end GPU with software ray tracing- hardware ray tracing is the version that provides the highest quality reflections, but would see more use in archviz projects rather than games. Correct Lumen usage is more performant than traditional methods, but can encounter issues with noise, ghosting and other hiccups with fast camera movements or objects, potentially helped (at least partially) by anti-aliasing methods.
It is a performance gain to disable Static Lighting entirely in your project if using Lumen, as this will save on shader permutations that won't be utilised. The only time you wouldn't want to do this is if you're using Lumen Reflections independently of Lumen GI, as disabling LGI will permit usage of static lighting. Lumen has no use for static lights as it works off of distance fields and the surface cache rather than lightmaps.
Lumen also works best with nanite meshes, or at least meshes that are reasonably broken apart. By default it will calculate bounces off of 12 approximation planes, which may only be changed globally, so maybe don't touch it. If your project doesn't want to use nanite in conjunction with Lumen, just make sure meshes aren't to big and complex, or too minute to be correctly lit.
The view mode 'Dedicated Reflection Rays' tells you which meshes Lumen is using dedicated reflection rays for, surprisingly. This will generally be for anything with lower than 0.4 roughness, but we can use console variables to change this threshold. Oftentimes the controls for foliage can be set to 0 without any noticeable difference, as the reflections from leaves aren't very crisp or dominant in the scene. For me, the only additional traces were for the mud under the leaves and the candles, so I could remove the traces entirely and just use the approximation, but you might get a better result with something like a 0.2 clamp.


Pros:
Can use GI and reflections independently
Integrated with other UE5 systems
Doesn't require the creation of lightmaps
Off-screen reflections
Generally higher quality
Cons:
Errors can be trickier to solve
Smaller/thinner objects require manual attention to avoid noise or shadowing issues
Higher rendering costs for objects lower than 0.4 roughness
Not uncommon to have noise artefacts
Not supported on lower spec PCs or older gen consoles
Baked Lighting
Baked lighting with screen space reflections is what has been the gold standard until very recently, and even with the introduction of things like Lumen, a lot of developers still prefer this method for it's reliability and performance. The strongest and easiest argument to make for UE4 methods is that we're all used to them, a million games have been made and shipped with them, and frankly UE5 is unchartered waters for nearly everyone that uses it right now. The latest instalment of the S.T.A.L.K.E.R. series showcases some of the worst the engine has to offer, with reflection noise, strange LOD issues, improper use of caching- the list goes on.
Baked lights, comparatively, behave exactly as you'd expect, since they're fixed in place before shipping. Static baked lighting is 'free' and doesn't incur a runtime cost like other light types, though it doesn't always give you the best results with specular or roughness, so using a combination of baked fill lights with stationaries as seen here for important lights or glancing angles is generally best.
Static lighting should always be used in conjunction with Lightmass Importance Volumes, which ensure the focus areas get high quality indirect/bounce lighting and better quality shadows. It's better to not have these volumes take up the whole space, and instead use several smaller volumes for important rooms in a level. I won't spend too long on these, but information about setting them up can easily be found in the Unreal documentation.
Reflection captures are the final thing required for static lighting. Box reflection captures are cheaper than their sphere counterparts, but can often have noticeable errors, though they are good for small and medium rectangular rooms, which many levels are made from. Through culling and mipmaps, reflection captures have a minimal performance impact in most cases.
Lightmap Density (as a general point of reference) should be blue for ceilings, green for floors and walls and no orange or red should ideally be seen. Lightmap resolution can be seen in the corresponding view mode and adjusted in the Static Mesh asset, though if dropping it down negatively affects the visuals of certain assets there should be a compromise in increasing the resolution.


Pros:
Static lights have a much lower performance cost
Can use as many lights as you need without optimisation worries further down the line
Proven working workflow for many years, and with a lot of resources and examples to match
Cons:
Requires meshes to have lightmaps
Less dynamic, and so less interactability during gameplay
Requires stationary or moveable lights for nice captures of less rough surfaces
Requires reflection captures
I hope this article had something useful for you, I always find it helpful to write up my findings when I start new things to solidify my own understanding, and that's certainly true for lighting. I've just done my first lighting project that can be found in the 3D section of my homepage, and in a higher quality on ArtStation.
Thanks for reading !


Comments