A Comprehensive Guide to Kernels & Convolution
- Abby Karnstein
- Jul 25, 2023
- 5 min read
Updated: Jul 27, 2023
If you've ever had the misfortune of musing on the maths behind every pixel on a screen, this post should (hopefully) illustrate exactly that, or at least part of it. Here I'll detail how kernels work in the context of pixel processing and filters, applicable from anything from Photoshop the Unreal Engine. The former may use sharpening, blurring, or edge detection kernels for the 'stroke' operation, and the latter we can see with things like post-processing materials. Ever wondered how Borderlands get's it's graphic novel lines? Or Divinity 2 highlights allies and enemies in combat? Well, there's a seperate post for that, but the fundamentals are below.
Convolution is a process that combines two sets of data, 'sliding' a smaller set of values (otherwise called a filter or a kernel) over a larger set of data (e.g. the screen), performing calculations with each evaluated pixel and assigning it a final numebr value. We can refer to kernels here as matrices, but keep in mind that kernels and matrices are seperate things in mathematics, despite similar visual representation.
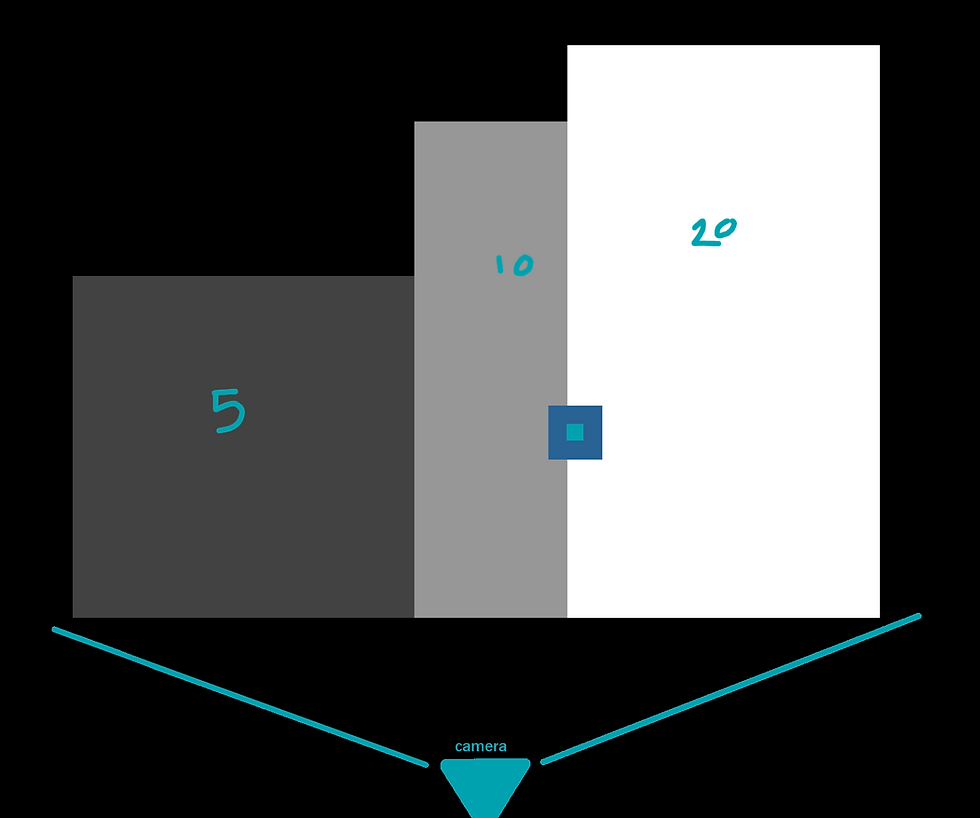
If we consider the below image, where each 'block' has a representative depth from the camera. For this example, we can consider the whitest block the have a depth of 20, the mid grey as 10, and the darkest as 5, with the black having a value of 0.

Below is a 3x3 kernel, the blue represents the currently evaluated pixel. Upon evaluation, the GPU will take into account the neighbours of the currently evaluated pixel to see how different these neighbours are from one another, and finally output a single result. The values of the pixels will be multiplied against the chosen matrix values.


If we sample the highlighted pixel (lightblue), with a 3x3 kernel around it (midblue), there is no change in depth, both the currently sampled pixel and the neighbours in the kernel have a value of 20. Remember, the final result will be a single number, which will change depending on the kernel we're using.
An 'identity' kernel is the same as any identity calculation- it will not change the final result, the output will be perfectly equal to the input. This can be useful as a baseline to establish the function is doing what it should. A 3x3 identity kernel looks like this:

If we say that all the values above are 20, the current pixel as well as the neighbours, we get this:

Each pixel will be multiplied aginst the corresponding matrix values, with the neighbours resulting in 0 and the current pixel at 20, as (0x20) = 0 and (1x20) = 1. As the original value of the pixel was 20, no change has taken place, and the pixel appears as it did in the original image.

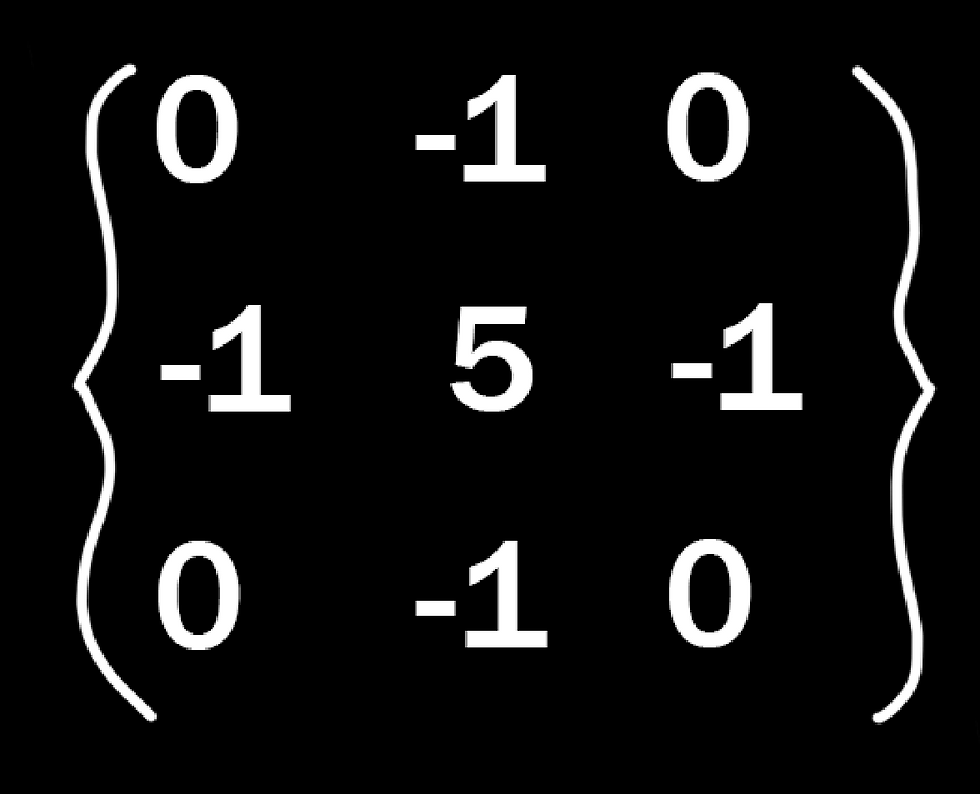
But what if we have a matrix that does change the final result? Below is the generic matrix for a sharpen filter. The sharpen is basically an edge detect, but keeps the regular image underneath instead of return just the edges.

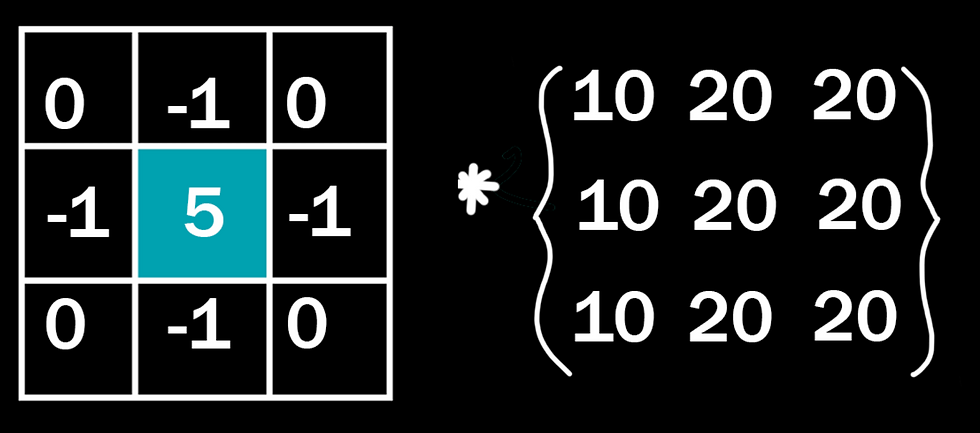
If we sum the neighbours with the current pixel (5 + - 4) we get a final result of 1 in the positive, illustrating the previous point. An edge detect would have an unchanged result of 0, or black, so anything that is not changing from neighbour to neighbour will be ignored, and only the edges will return a positive, visible result. To help visualise, let's put it in the 3x3 kernel.

If we have the same evaluated pixel, with it and it's neighbours all having a value of 20, what would the result be?
(20 * 0) + (20 * -1) + (20 * 0) + (20 * -1) + (20 * 5) + (20 * -1) + (20 * 0) + (20 * -1) + (20 * 0)
or:
(0) + (-20) + (0) + (-20) + (100) + (-20) + (0) + (-20) + (0)
= 20
The math is very slightly more involved to manually calculate, but as this isn't an edge, it will again simply return the original value. Which begs the question, what if we do sample an edge?

Say we sample this pixel instead, it still has a value of twenty, but some of it's sampled neighbours are now worth 10.
(0) + (-20) + (0) + (-10) + (100) + (-20) + (0) + (-20) + (0)
=30, higher than the original value. And so the original pixel will be altered. In this case, it will be brightened.

But what if we sample one pixel to the left? Now we have more of the darker value

(10), than the lighter value (20). How does this effect the outcome? What happens to the pixel in this instance?
Well, conversely, it gets darker. We end up with of course 4 null values (0), three -10s, a -20, and 50 in the middle, which will actually give us a result of 0, or black.

And, if we actually preview this result in Photoshop's custom filter, we can verify these calculations.
There is a very obvious black pixel on the border between these two values, though admittedly perhaps a smaller pixel size than our demonstration one.

Hopefully with these examples you have some grasp of what kernels are and their function and application. I ended up down this rabbit hole after I was tasked with making an edge detection post process material, and after the fact, I just wanted to know exactly what was doing what.
If you're one of the eight people on earth that finds this interesting, I'll be continuining with posts on how other the blur kernels work below, as well as a seperate post on Laplacian and edge detection, alongside it's applications (that Borderlands/Divinity thing I promised earlier).
Ok, so, blurring:
You have two standard ways to blur an image with kernels, the box blur, and the Gaussian. If you're in the games industry, chances are you know the visual differences between the two, but how does that translate to the kernels it's using?
Below are the kernels, Gaussian on the left, box on the right.

Respective blurs applied:

Above is the 3x3 kernel, if we want a really extreme blur like the one below, we need a much bigger kernel to sample from. For the sake of me not typing out 49+ numbers per kernel, I'll be sticking to 3x3 and 5x5 kernels in these examples.

If you've been on top of the maths up to this point, you'll notice that these kernels return a huge result, our sharpening example of three 10 values and six 20 values will return a massive 280 on the Gaussian, a far cry from the original 20 of the sampled pixel. Because of this, these functions require an extra process we call 'normalisation'. In the simplest terms, we're dividing this final result by the total sum of the kernel, any results with the Gaussian will be divided by 16, and the box blur by 9.
What the blur functions are actually doing is averaging out the results between pixels, and creating a smoother transition. If we take our previous results, we can see exactly what that means numerically.

10 + 10 + 20 + 10 + 10 + 20 + 10 + 10 + 20 = 120 / 9 = 13.3˙
And the one to the right:

10 + 20 + 20 + 10 + 20 + 20 + 10 + 20 + 20 = 150 / 9 = 16.6˙
So we can verify that these two pixels on the edge are now closer in value- the darker pixel has brightened slightly, while the brighter pixel has darked by the equivalent amount.


5x5 kernel example:

So, in summary, a kernel is a 2D array used to sample each pixel on it's screen as well as it's neighbours to determine a new value for the sampled pixel. Both the current and neighbour pixels are assigned 'weights' that will be multiplied against the sample and then added. All of these arbitrary numbers can really make visualising these things confusing, so if you have any further interest in using kernels, I invite you to do the maths yourself to see what's happening, or grab a program like Photoshop to input your own kernel weights, and see what you come up with. :)


Comments